Monday, December 28, 2009

Pomegranates


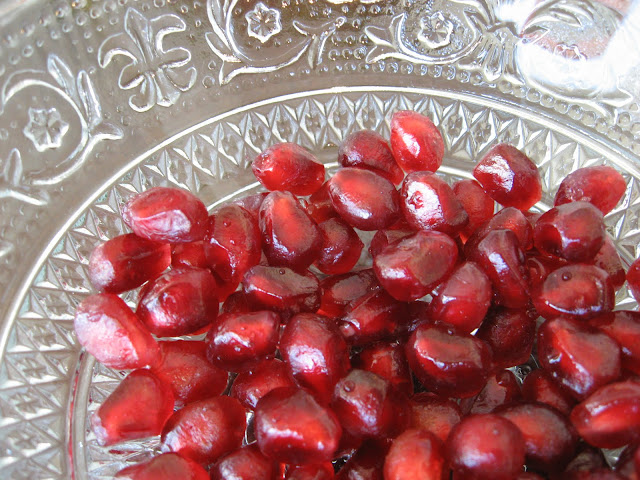
I adore pomegranates


But I don't get to buy these delicious delicacies as often as I'd like because they are a little pricier than other more common fruits.  Yet when I do, I thoroughly enjoy it!  Pomegranates have a round red exterior and an interior completely packed with individual juicy, nutty, ruby seeds, called arils.  It is a fun food to eat and it's good for you!  Many people like to mix the seeds into recipes, but I haven't done that.  I usually eat mine as a stand-alone breakfast.  It fills me up quite nicely with its rich and refreshing flavor and texture!  I hope you come to love this exotic fruit as much as I do! 


Pomegranates are a little tricky to prepare, but with some good tips, it's no problem at all.  Here's what I like to do:

First, make sure you wear an apron.  Sometimes, no matter how careful you are, those little seeds will squirt you with dark red juice.  We don't want any shirt stains, people, so clad thyself with thine apron armor!  :) 

Next, I take a serrated knife and slice a shallow X into the top of the fruit.  The cut should be about an inch down, but you can go deeper if you want.  Now use those scored edges to begin breaking into the pomegranate.  Simply use your hands to break the fruit into smaller pieces, exposing the tasty seeds, held in place by brittle, white, sponge-like walls.

The best tools to use to dislodge the arils are your very own fingers; any other implement will just leave you unnecessarily squirted with juice.  Using the pads of your fingers, spend a few minutes and gently rub the seeds out of their cubbies.  Some people like to do this step in a shallow bowl of water because the seeds sink to the bottom while the inedible pomegranate walls float to the top for easy discarding.  I don't think the bowl of water is necessary, but everyone is a little different about their preferences.  So if it helps you, go ahead and utilize it!  In the end, throw out the white stuff and save only the seeds.

Finally, rinse the arils in a small colander.  That's it!  Be prepared for a taste-treat--the juicy little seeds are ready to munch!  Enjoy!
Thursday, December 10, 2009

Banana Nut-Butter Cookies


While I was reading through a 1978 church pamphlet entitled, "Essentials of Home Production and Storage", I stumbled upon this recipe.  And to my delight, I hardly needed to adapt the ingredients; they were already vegan-friendly.  (You can't imagine how excited I was about that!)  You will like these cookies!  They are easy to make and bake.  And the recipe is versatile!  Exercise your right to go without gluten.  Use your typical nut butter or try something new.  Even feel free to omit the banana for a different egg substitute if you like.  You can't go wrong!  But I do have to say, the very best thing about this dessert is eating it.  :)  Yields 30 cookies. 

Banana Nut-Butter Cookies

Organic Ingredients:
1 1/2 cups whole-wheat or gluten-free flour
1/2 tsp baking soda
1/4 tsp sea salt
1/2 cup vegan butter, softened (Earth Balance brand)
1/2 cup white sugar
1/2 cup brown sugar
1 ripe banana or a powder egg substitute equivalent to 1 egg
1/2 cup nut butter

Instructions:
It's easiest to make cookie dough with a mixing machine.  I hope you have one!  And remember to get your silicone spatula ready to scrape the bowls as they rotate.  Let's get started!  Preheat the oven to 350 degrees.  In a large mixing bowl measure the flour, baking soda, and salt.  Stir on lowest speed for a few moments.  Set bowl aside.  Next, place the butter, sugar, banana, and nut butter of your choice into another mixing bowl and set the beaters to a low speed for a minute or two.   Finally, add the wet ingredients into the bowl of dry ingredients.  On a low speed, mix everything together thoroughly.  Roll the dough into small balls and arrange them evenly on ungreased cookie sheets.  If you want, with a floured fork, press a checkered pattern into each ball.  Now, bake for 9-10 minutes or until lightly brown.  Cool on the sheet for another minute before removing.  Enjoy!

Monday, December 7, 2009

Sweet and Sour Rice


I don't usually prepare dinners that mix fruit with the meal...  but what of it.  This Chinese-inspired recipe makes a great garnish for rice!  And the addition of crunchy chow mein noodles makes it fun!  My mom has been fixing this dish ever since I can remember.  I believe she modified the recipe from a page fallen out of an old Better Homes and Gardens cookbook.  More recently, we gave it a few simple vegan adjustments, and that's what you'll see here.  I find it interesting that while growing up, Sweet and Sour didn't appeal to me much.  Perhaps it's an acquired, adult flavor, because I know I enjoy it now!  Plus, it gets me away from my ordinary pasta rut; a taste of Asia is a delightful experience once in a while!  To create a truly ethnic atmosphere, remember to use chop sticks!  Makes enough to feed 6 hungry people, approximately.

Sweet and Sour Rice

Organic Ingredients:
2 cups uncooked brown rice
1 12 oz. bag of chow mein noodles (optional)
3 tbsp cornstarch
1/2 cup brown sugar
2 6 oz. cans of pineapple juice
scant 1/2 cup apple cider vinegar
1 tbsp Braggs or low-sodium soy sauce
1 tsp sea salt
1 20 oz. can pineapple tidbits in juice
1 green bell pepper, chopped
1 sweet onion, chopped
1 8 oz. Soy Deli brand, savory flavor baked tofu, chopped
1 8 oz. can of sliced water chestnuts (optional)

Instructions:
Before anything else, begin cooking the brown rice.  It will need about an hour, so don't leave it till the end!  Use the instructions on the rice box or bag to get started.

Get out a lovely bowl and empty the bag of chow mein noodles into it; this is a secondary garnish.  Set aside to serve with the finished product.

This next step takes about 10 minutes.  In a small, one quart saucepan, mix the cornstarch and brown sugar.  Continue adding pineapple juice, vinegar, Braggs, and salt.  Also, open the can of pineapple chunks and drain the juice into the quart pan, but leave the tidbits behind.  Stir completely.  Now cook the syrup-like mixture on high setting.  A few minutes later, after it boils, turn down the heat to medium-high.  Stir regularly to avoid lumps.  When mixture turns shiny, it is a sign of completion; wisk 30 seconds more then remove pan from heat.  Set aside.

Final step: Get out a large skillet.  Fill it with the pineapple tidbits, pepper, onion, tofu, and perhaps water chestnuts, then pour the syrup mixture on top of it all.  Stir together.  Set the pan to high heat, just until it boils.  When it does, put the lid over it and turn the heat down low until it is gently simmering.  Cook another 5 minutes, then remove from stove.  (Hopefully the rice is done also!)  You're ready to eat; serve straight out of the skillet!


Friday, December 4, 2009

Dinosaur Salad


Occasionally, I eat healthy!  :)  So I thought for a fun change of pace, I'd post about something fresh and wholesome.  I present you with Dinosaur Salad!  I call it this because it features some produce I don't think many people know about or else fail to utilize very often: Lacinato Kale (or Dinosaur Kale, as it is playfully called).  This unusual vegetable appears to be a close relative of wild cabbage, and is also related to broccoli, cauliflower, collard greens, and brussels sprouts.  The leaves are dense and have a strong flavor, like that of cabbage or broccoli.  But Dino Kale sports more of all the good stuff, like vitamins, antioxidants, fiber, etc, than other members of it's Brassica oleracea family.  Well, it looked mighty charming at the grocery store one evening, and I'd heard good things about it, so I purchased some.  Even though I think most people probably cook the life out of the poor plant before they eat it, I decided to enjoy mine raw, in a salad.  I don't have exact amounts for this recipe, mostly just a list of ingredients.  But that's the beauty of green salads; they're a work of art--different every time!

Dinosaur Salad

Organic Ingredients:

Vegetables:
dino kale leaves, remove stems and chop
red leaf lettuce, remove stems and chop
carrots, shredded
red cabbage, chopped
sweet onion, diced
avocado, sliced
tomato, sliced

Dressing:
a squeeze of flaxseed oil
a squeeze of fresh lemon
a dash of sea salt
a dash of pepper

If you make a huge bowlful, be sure to add the dressing to your individual serving only.  Plus, what you don't eat makes a healthy leftover to store in your fridge; you CAN get great nutrition while indulging those uncontrollable munching urges!  How's that for a change?!    

Be brave--try something new!  Enjoy!


Thursday, November 12, 2009

Rich Chocolate Chip Cookies


I've been searching for what seems like forever (three years) for the perfect vegan chocolate chip cookie.  And at the charity dinner for Ching Farm last weekend, I finally tasted them.  After only the first bite--WOW!  I celebrated!  This very well might be it!  I just had to meet the creator of such a wonderful dessert.  When I discovered he was sitting just a table away, I grabbed a piece of scratch paper and a pen, then hastened to his side.  His name was Rich Hawkes, a very friendly young adult and down-to-earth fellow vegan.  To my delight, he was more than happy to share his recipe with me.  Now I desire to share it with you!  In Rich's honor, I named the cookies after him!  The only thing I adapted was the flour.  I use whole-wheat.  It makes a darker finished product, but takes nothing from the flavor.  Enjoy!  Yields approximately 30 cookies.

Rich Chocolate Chip Cookies

Organic Ingredients:
Ener-G brand egg replacer, equaling 2 eggs
2 cups whole-wheat flour
1 tsp sea salt
1 tsp baking soda
1 cup vegan butter, softened (Earth Balance brand is ideal)
1 cup brown sugar
1/2 cup sugar
1 tsp pure vanilla
2 cups chocolate chips

Instructions:
Preheat the oven to bake at 350 degrees.  First, in a cereal bowl, follow the equivalents and directions on the Ener-G egg replacer box for 2 eggs.  Wisk well by hand and set aside.  Now, if you have an electric mixing machine, use it for the remainder of the recipe to simplify things.  (Remember to use a silicone spatula to scrape the sides of the bowls while mixing for a better overall consistency.)  Next, use a large mixing bowl and combine on lowest speed the flour, salt, and baking soda.  Set aside.  Use a smaller mixing bowl for the butter, sugar, vanilla, and egg replacer mixture.  Blend these wet ingredients on lowest speed.  Pour wet ingredients into the large bowl of dry ingredients and mix together on a low speed setting.  Now add the chocolate chips and mix again.  Roll the dough into small balls and place on a baking sheet.  You don't need to grease it.  Place tray in the oven for 9-10 minutes.  Remove from oven and let cookies cool on sheet for another 3 minutes or so.  Cookies are now ready to serve warm, or cool them on a rack.  Continue until all the dough balls have been baked.

Saturday, October 24, 2009

Fat-Free Vegan Chocolate Cake


This dessert is vegan and fat-free!! I know, right?!  I titled it in my Jordan's honor because he makes it for himself, he makes it for me, he makes it for neighbors, he makes it for anybody and for any reason.  I think everyone knows about his delicious cake!  It's fast becoming a legend.  And if you don't know about it yet, you have only to ask... he'll make one for you, too!  Be sure to pair this dessert with a fat-free frosting: Just use applesauce or mashed bananas in place of margarines or oils in your favorite recipe.  Enjoy!  Makes 24 servings. (The picture above features a half recipe--it bakes as a 9x9 cake beautifully!)

Jordan's Fat-Free Vegan Chocolate Cake

Organic Ingredients:
1 1/2 cups of whole-wheat flour
1 1/2 cups of white flour (or use wheat flour)
2 tsp baking soda
1/2 tsp sea salt
3/4 cup cocoa powder
1 1/4 cup applesauce
1 1/2 cups sugar or dry sweetener
2 tsp pure vanilla extract
2 cups water or plant-based milk

Instructions:
Preheat the oven to 375 F degrees. In a large bowl combine flour, baking soda, salt, and cocoa powder and mix on lowest speed setting.  Set aside. In a separate bowl mix applesauce, sugar, vanilla, and water/milk.  Now pour wet ingredients into the bowl of dry ingredients and stir until "just mixed" and the batter is smooth.  Pour into baking dish and bake for 35 minutes or until toothpick comes out clean when inserted into cake center. It's hard to burn this moist cake, so if in doubt leave it in the oven an extra 5-8 minutes. Remove from heat and let it cool before applying frosting. Easy-peasy! Enjoy! 


Bo Urr! Corn Pancakes


“Oi dearly do luv pancakers wi brekkist!”
--Grumm the mole, from Brian Jacques’ novel of Redwall, Martin the Warrior, page 310.  

Jordan and I agree that many a Redwaller may have enjoyed such a "brekkist". We “dearly do luv pancakers” too, Mr. Moler!  Although, it must be said that we usually eat them at dinnertime.  Serve with organic vegan butter and organic pure maple syrup or any favorite jam. Makes 16 small cakes.

Bo Urr! Corn Pancakes

Organic Ingredients:
1 16oz. can of corn, drained
1 1/4 cups white flour
1 tsp aluminum-free baking powder
1/2 tsp sea salt
1 1/2 cups of plain soymilk

Instructions:
Pour corn into a food processor and blend until kernels are well pulverized. Set aside. Sift together the flour, baking powder, and salt. Then add soymilk and mashed corn to the dry ingredients. Stir carefully until “just mixed” (if you mix too vigorously, the pancakes won’t get fluffy!). Set stove top to medium heat. Portion out 1/4 cup of batter onto a lightly greased, non-stick pan/griddle. When the pancake center starts to congeal and bubble, flip it over and cook the other side until golden brown. Each side takes approximately 3 minutes. Repeat steps until batter is all used up. Keep cakes warm in a covered pot until ready to eat.

Tuesday, January 20, 2009

Naughty Nog

Egg-less Egg Nog! Can you believe it? You will once you try it! Jordan and I enjoy this beverage especially during the holidays. But we call it “naughty” because it tastes so good that we want to have it all year round, (although we really shouldn't!) Makes 2 quarts.

Naughty Nog

Recipe adapted from How it all Vegan!, page 36,
By Tanya Barnard and Sarah Kramer, 1999.

Organic Ingredients:
2 1/2 cups soft tofu
4 cups plain soymilk
1 tbsp pure vanilla extract
3/4-1 cup sugar
2 tbsp pure maple syrup
1/4 tsp turmeric
1/4-1/2 tsp nutmeg
1 tsp rum flavoring
dash of sea salt

Instructions:
In a blender/food processor, thoroughly puree all the ingredients, plus just 1 cup of the soymilk, until smooth and creamy. Pour the unfinished nog into a large pitcher along with the remaining soymilk and mix with a long-handled spoon. Serve chilled and well stirred.

Spicy Garlic Toss For Noodles


If you enjoy garlic, this is the sauce for you! To cut down on the spiciness, omit the cayenne and lessen the pepper to your liking.  Also tastes wonderful on cruciferous veggies, such as broccoli.  Makes 2-4 servings.

Spicy Garlic Toss For Noodles

Recipe adapted from How it all Vegan!, page 83,
By Tanya Barnard and Sarah Kramer, 1999.

Organic Ingredients:
4-6 cloves garlic, minced or crushed
2 tbsp grapeseed oil
1/4 cup distilled water
2 tsp Bragg's (or soy sauce)
1/2 tsp paprika
1/4 tsp dried basil
1/4 tsp dried thyme
1/8 tsp (or less) dried pepper
1/4 tsp sea salt
dash of cayenne pepper


Instructions:
In a small saucepan, sauté garlic in 1 tablespoon of oil on medium-low heat until garlic is translucent. Be careful not to burn. Add the water, remaining oil. Bragg's, paprika, basil, thyme, pepper, salt, and cayenne and bring to a boil. Simmer for 8-15 minutes. Toss with wheat spaghetti or linguine. Or serve sauce straight out of the pot if you prefer.

Faux Cheese Sauce


Behold!  The ability to create mac 'n' cheese--vegan style!  We love this sauce on pasta, rice, baked potatoes, and just about anything.  It makes a wonderful substitute in any recipe that calls for Campbell’s creamy soups. Makes 2-4 servings.  (We always double it!)

Faux Cheese Sauce

Recipe adapted from How it all Vegan! page 79,
By Tanya Barnard and Sarah Kramer, 1999.

Organic Ingredients:
1/2 cup nutritional yeast
3 tbsp whole-wheat flour
4 tsp cornstarch (or arrowroot powder)
3/4 tsp of sea salt
1 cup water
2 tsp Dijon mustard

Instructions:
In a small saucepan, whisk together the yeast, flour, cornstarch, and salt. Add the water and continue to whisk thoroughly. Stir over medium heat until sauce becomes thick, then stir in the mustard. Heat for 30 seconds more and serve. We hope you like it as much as we do!


Padawan Pancakes


I am Jordan’s pancake apprentice; add to that a healthy dash of our Star Wars obsession, and a very appropriate title is born! This is a no-fail, fast, fantastic breakfast recipe! It also makes great waffles!  Be sure to use the wheat flour for the ultimate flavor experience. Serve with organic raw peanut butter and organic pure maple syrup. Makes 20 small cakes.

Padawan Pancakes

Recipe adapted from How it all Vegan!, page 44,
By Tanya Barnard and Sarah Kramer, 1999.

Organic Ingredients:
1 cup whole-wheat flour
1 cup white flour (or another cup of wheat flour)
1 tsp baking soda
1 tsp aluminum-free baking powder
2 1/2 cups plain soymilk
dash of sea salt

Instructions:
In a large bowl, sift the flour, baking soda, and baking powder together. Add the soymilk and mix together carefully until “just mixed” (if you mix too vigorously, the pancakes won’t get fluffy!). Portion out about 1/4 cup of batter onto a lightly greased, medium-heat, non-stick pan/griddle. When the pancake center starts to congeal and bubble, flip it over and cook the other side until golden brown. Repeat steps until batter is all used up. Keep cakes warm in a covered pot until ready to serve.

Merciful Meatless Sloppy Joes

This burger mix is merciful because no cows were harmed in the making! Most every Fourth of July, Jordan and I share this delicious dinner with the entire family. But that doesn’t stop us from enjoying it all year round. For maximum fun, eat the meal outside under a shady patio or deck.  Be sure to serve it on top of organic whole-wheat toast. Makes 3-6 large helpings.

Merciful Meatless Sloppy Joes

Recipe adapted from How it all Vegan!, page 112,
By Tanya Barnard and Sarah Kramer, 1999.


Organic Ingredients: (two part)

Tomato Sauce:
1 small onion, chopped
4 cloves garlic, minced
1 6oz. can tomato paste
2/3 of a 28oz. can of diced tomatoes (or 2 large tomatoes, chopped)
1 tsp sea salt
1 tsp dried basil
1 tsp dried oregano
1/4 tsp pepper

Everything Else:
1 cup boiling distilled water
1 1/2 cups TVP (textured vegetable protein)
1 medium onion, chopped
1 medium green pepper, chopped
remaining 1/3 of the 28oz. can of diced tomatoes (or 1 large tomato, chopped)
3 tbsp of sweet-pickle relish
2 tbsp of Bragg's (or soy sauce)
1 1/2 tsp chili powder
dash of cayenne pepper
dash of allspice
dash of sea salt


Instructions:

Sauce: In a blender/food processor, blend together the garlic, tomato paste, diced tomatoes, salt, basil, oregano, and pepper until you reach the desire consistency. Set aside.

TVP: In a medium size bowl, pour the boiling water over the TVP and set aside for about 15 minutes.

Everything Else: In a medium size saucepan, sauté the onions in a little water on medium-high heat until translucent. Lower heat to medium and add the peppers, remaining diced tomatoes, relish, Bragg's, chili powder, cayenne, allspice, salt, and sauce. Simmer for 5 minutes. Add TVP to saucepan and stir together. Simmer on medium-low heat for another 20-30 minutes.

Easy Mild Chili


Using canned beans is what makes this recipe easy. Savor this stew on a cold winter night!  
Makes 6-8 large servings.

Easy Mild Chili

Recipe adapted from How it all Vegan!, page 101,
By Tanya Barnard and Sarah Kramer, 1999.

Organic Ingredients:
1 medium onion, chopped
2 medium carrots, chopped
6 cups of pinto beans (or whatever types of beans you may have available)
1 28oz. can of diced tomatoes (3 1/2 cups)
1 6oz. can of tomato paste
1 12oz. can of corn (1 1/2 cups)
3/4 cup of cooked brown rice
1 tbsp chili powder
1/4 tsp of black pepper
1 tsp of curry paste (curry powder can be substituted)
2 tsp of sea salt
2 cups of vegetable stock

Instructions:
In a large pot, sauté the onions and carrots in stock on medium-high heat until the onions become translucent. Add the remaining ingredients and stir together. Simmer on medium-low heat for 40-60 minutes, stirring occasionally.