Monday, December 28, 2009

Pomegranates


I adore pomegranates


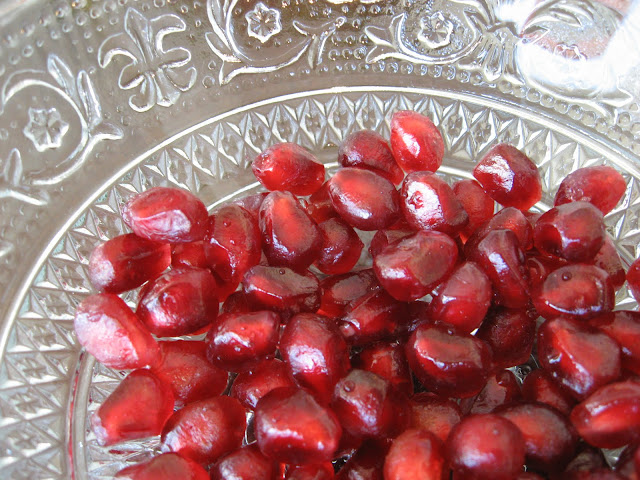
But I don't get to buy these delicious delicacies as often as I'd like because they are a little pricier than other more common fruits.  Yet when I do, I thoroughly enjoy it!  Pomegranates have a round red exterior and an interior completely packed with individual juicy, nutty, ruby seeds, called arils.  It is a fun food to eat and it's good for you!  Many people like to mix the seeds into recipes, but I haven't done that.  I usually eat mine as a stand-alone breakfast.  It fills me up quite nicely with its rich and refreshing flavor and texture!  I hope you come to love this exotic fruit as much as I do! 


Pomegranates are a little tricky to prepare, but with some good tips, it's no problem at all.  Here's what I like to do:

First, make sure you wear an apron.  Sometimes, no matter how careful you are, those little seeds will squirt you with dark red juice.  We don't want any shirt stains, people, so clad thyself with thine apron armor!  :) 

Next, I take a serrated knife and slice a shallow X into the top of the fruit.  The cut should be about an inch down, but you can go deeper if you want.  Now use those scored edges to begin breaking into the pomegranate.  Simply use your hands to break the fruit into smaller pieces, exposing the tasty seeds, held in place by brittle, white, sponge-like walls.

The best tools to use to dislodge the arils are your very own fingers; any other implement will just leave you unnecessarily squirted with juice.  Using the pads of your fingers, spend a few minutes and gently rub the seeds out of their cubbies.  Some people like to do this step in a shallow bowl of water because the seeds sink to the bottom while the inedible pomegranate walls float to the top for easy discarding.  I don't think the bowl of water is necessary, but everyone is a little different about their preferences.  So if it helps you, go ahead and utilize it!  In the end, throw out the white stuff and save only the seeds.

Finally, rinse the arils in a small colander.  That's it!  Be prepared for a taste-treat--the juicy little seeds are ready to munch!  Enjoy!
Thursday, December 10, 2009

Banana Nut-Butter Cookies


While I was reading through a 1978 church pamphlet entitled, "Essentials of Home Production and Storage", I stumbled upon this recipe.  And to my delight, I hardly needed to adapt the ingredients; they were already vegan-friendly.  (You can't imagine how excited I was about that!)  You will like these cookies!  They are easy to make and bake.  And the recipe is versatile!  Exercise your right to go without gluten.  Use your typical nut butter or try something new.  Even feel free to omit the banana for a different egg substitute if you like.  You can't go wrong!  But I do have to say, the very best thing about this dessert is eating it.  :)  Yields 30 cookies. 

Banana Nut-Butter Cookies

Organic Ingredients:
1 1/2 cups whole-wheat or gluten-free flour
1/2 tsp baking soda
1/4 tsp sea salt
1/2 cup vegan butter, softened (Earth Balance brand)
1/2 cup white sugar
1/2 cup brown sugar
1 ripe banana or a powder egg substitute equivalent to 1 egg
1/2 cup nut butter

Instructions:
It's easiest to make cookie dough with a mixing machine.  I hope you have one!  And remember to get your silicone spatula ready to scrape the bowls as they rotate.  Let's get started!  Preheat the oven to 350 degrees.  In a large mixing bowl measure the flour, baking soda, and salt.  Stir on lowest speed for a few moments.  Set bowl aside.  Next, place the butter, sugar, banana, and nut butter of your choice into another mixing bowl and set the beaters to a low speed for a minute or two.   Finally, add the wet ingredients into the bowl of dry ingredients.  On a low speed, mix everything together thoroughly.  Roll the dough into small balls and arrange them evenly on ungreased cookie sheets.  If you want, with a floured fork, press a checkered pattern into each ball.  Now, bake for 9-10 minutes or until lightly brown.  Cool on the sheet for another minute before removing.  Enjoy!

Monday, December 7, 2009

Sweet and Sour Rice


I don't usually prepare dinners that mix fruit with the meal...  but what of it.  This Chinese-inspired recipe makes a great garnish for rice!  And the addition of crunchy chow mein noodles makes it fun!  My mom has been fixing this dish ever since I can remember.  I believe she modified the recipe from a page fallen out of an old Better Homes and Gardens cookbook.  More recently, we gave it a few simple vegan adjustments, and that's what you'll see here.  I find it interesting that while growing up, Sweet and Sour didn't appeal to me much.  Perhaps it's an acquired, adult flavor, because I know I enjoy it now!  Plus, it gets me away from my ordinary pasta rut; a taste of Asia is a delightful experience once in a while!  To create a truly ethnic atmosphere, remember to use chop sticks!  Makes enough to feed 6 hungry people, approximately.

Sweet and Sour Rice

Organic Ingredients:
2 cups uncooked brown rice
1 12 oz. bag of chow mein noodles (optional)
3 tbsp cornstarch
1/2 cup brown sugar
2 6 oz. cans of pineapple juice
scant 1/2 cup apple cider vinegar
1 tbsp Braggs or low-sodium soy sauce
1 tsp sea salt
1 20 oz. can pineapple tidbits in juice
1 green bell pepper, chopped
1 sweet onion, chopped
1 8 oz. Soy Deli brand, savory flavor baked tofu, chopped
1 8 oz. can of sliced water chestnuts (optional)

Instructions:
Before anything else, begin cooking the brown rice.  It will need about an hour, so don't leave it till the end!  Use the instructions on the rice box or bag to get started.

Get out a lovely bowl and empty the bag of chow mein noodles into it; this is a secondary garnish.  Set aside to serve with the finished product.

This next step takes about 10 minutes.  In a small, one quart saucepan, mix the cornstarch and brown sugar.  Continue adding pineapple juice, vinegar, Braggs, and salt.  Also, open the can of pineapple chunks and drain the juice into the quart pan, but leave the tidbits behind.  Stir completely.  Now cook the syrup-like mixture on high setting.  A few minutes later, after it boils, turn down the heat to medium-high.  Stir regularly to avoid lumps.  When mixture turns shiny, it is a sign of completion; wisk 30 seconds more then remove pan from heat.  Set aside.

Final step: Get out a large skillet.  Fill it with the pineapple tidbits, pepper, onion, tofu, and perhaps water chestnuts, then pour the syrup mixture on top of it all.  Stir together.  Set the pan to high heat, just until it boils.  When it does, put the lid over it and turn the heat down low until it is gently simmering.  Cook another 5 minutes, then remove from stove.  (Hopefully the rice is done also!)  You're ready to eat; serve straight out of the skillet!


Friday, December 4, 2009

Dinosaur Salad


Occasionally, I eat healthy!  :)  So I thought for a fun change of pace, I'd post about something fresh and wholesome.  I present you with Dinosaur Salad!  I call it this because it features some produce I don't think many people know about or else fail to utilize very often: Lacinato Kale (or Dinosaur Kale, as it is playfully called).  This unusual vegetable appears to be a close relative of wild cabbage, and is also related to broccoli, cauliflower, collard greens, and brussels sprouts.  The leaves are dense and have a strong flavor, like that of cabbage or broccoli.  But Dino Kale sports more of all the good stuff, like vitamins, antioxidants, fiber, etc, than other members of it's Brassica oleracea family.  Well, it looked mighty charming at the grocery store one evening, and I'd heard good things about it, so I purchased some.  Even though I think most people probably cook the life out of the poor plant before they eat it, I decided to enjoy mine raw, in a salad.  I don't have exact amounts for this recipe, mostly just a list of ingredients.  But that's the beauty of green salads; they're a work of art--different every time!

Dinosaur Salad

Organic Ingredients:

Vegetables:
dino kale leaves, remove stems and chop
red leaf lettuce, remove stems and chop
carrots, shredded
red cabbage, chopped
sweet onion, diced
avocado, sliced
tomato, sliced

Dressing:
a squeeze of flaxseed oil
a squeeze of fresh lemon
a dash of sea salt
a dash of pepper

If you make a huge bowlful, be sure to add the dressing to your individual serving only.  Plus, what you don't eat makes a healthy leftover to store in your fridge; you CAN get great nutrition while indulging those uncontrollable munching urges!  How's that for a change?!    

Be brave--try something new!  Enjoy!